
Contractor Stories
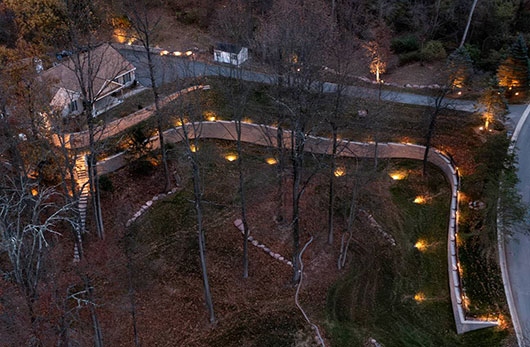
The 2020 wall is nearest the house and is above the new wall. The new wall is much longer and follows the drive and the road.
Project Profile
Design/build contractor
Willow Gates Landscaping LLCMohnton, PA
Project Designer & Manager
Jeremy R. MartinEngineer
Shippee EngineeringWall block
EP Henry Diamond Pro with Techo-Bloc Mini Creta banding and Architectural copingWall size
2,400 face feet12’ max height (including base courses)
Project value
$100K+In-house work
Retaining wallsUnderground drainage
Low voltage lighting
Plantings & landscaping
Site drainage
Work done by others
Fencing, lawn restorationRisks building a new wall in front of an old one
By Jeremy MartinIn 2020, we built a 500 sf retaining wall that made the front cover of Hardscape Magazine. Then, one summer evening in 2023 I stopped by to replace a few dead plants. While there, the client asked about building another wall. And the rest, as they say, is history…. In that first casual meeting, I threw out some rough numbers of what I thought the project might cost. I later returned to thoroughly map the site to begin the wall design.
The 2020 wall was built from the top side only since there were extreme 2:1 slopes at the toe. Those steep slopes continued 30’-50’ in front of the wall. This new wall was to be about 16’-20’ in front of the 1st wall, then continue along the driveway out to the street.
I had some immediate concerns. If you build walls, you know you always build from the bottom up… you don’t build the upper wall first, then come back to build the lower tier! That’s essentially what we would be doing. I warned them immediately that this design might not be feasible. I was concerned first about compromising the stability of the upper wall during construction.
Even by placing the new wall 16’-20’ away, I expected grid lengths of 8’-10’. That didn’t leave much dirt remaining in front of the original wall during construction! Post construction, I also had concerns about the long-term stability of the entire system. The global stability and compound slip circles needed to be evaluated by an engineer.
My first call was to the engineer of the 2020 wall. Could this proposed design work? After an initial review, they said no… the numbers just weren’t working. However, both the original design and this preliminary review were based on very conservative soil values. We could test the soils, and if they were stronger than anticipated, perhaps we could build the wall as the client requested.
The client approved the lab costs, and we began the search for a soil testing lab. The first lab took weeks to even quote the project. Hey, this is standard testing, right? Shouldn’t be too complicated? On to another lab, and we shipped two 5 gallon buckets of the onsite soils and one bucket of the fill we planned to import. The results were delayed many weeks beyond their initial promise, but we DID get good news. Both the onsite soils and imported fill soils tested stronger than anticipated. Yes, we could build this wall as requested!
Construction commences
We began the project connecting to an existing drain under the driveway, then continuing the 15” pipe nearly 200’ through the valley. There was a deep ravine that had eroded over the decades; this was not a constant flow, but decades of handling stormwater runoff had carved a gully that was over 6’ deep in some areas. We hauled in about 30 loads of fill dirt just to fill in that gully, cover the pipe and improve slopes on the property.We finally began the wall in late February, about 6 weeks later than planned. The first 100’ of the wall was wrapping around the home and the original retaining wall. The remaining 165’ of wall was a fill situation rather than a cut; we were primarily building up behind that section of the wall.
The first 100’ really didn’t have good bottom side access. Our first step was to cut our bench into the existing grade, about 7’ back from the face of the wall. That was wide enough to run our skid steer to dig out the bulk of the soils. The second step was to dig the footers; some of those soils were deposited near the wall, but much of that was dumped in the skid steer bucket and stockpiled a distance away.
An unfortunate result of digging the wall footer was that we only had about 4’-5’ of the bench cut remaining. That forced us to haul in all the materials for the footer, the drainage column behind the wall, and the soil with… what? We couldn’t use our skid steer. We do have powered wheelbarrows, but that wasn’t ideal either. We rented a tracked concrete buggy, and loaded it with our excavator. Efficient? Not compared to running our skid steer, but certainly better than pushing a wheelbarrow!
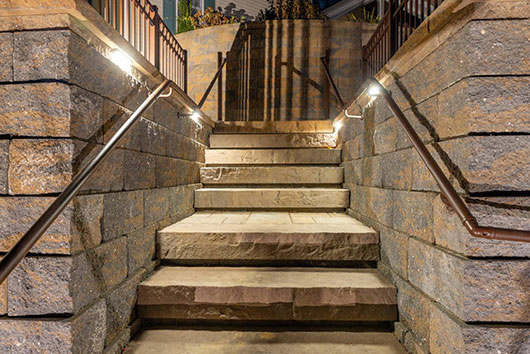
This client had a habit of making changes when we built the first wall, and that pattern wasn’t broken with this second wall. On the first day of digging wall footers, he asked… could we build steps down through the wall and into the valley? Well, yes we could… but I had to design and sell it quickly, because by lunchtime the following day we would have dug past the point where the stairs were to be built… and that closed off our access!
I got detailed elevations that afternoon, then designed, quoted and sold it by the following morning. I designed it to have 11 steps inset from the wall and 19 steps outset. The inset steps would be built with the wall, but the outset steps would be done much later in the project. We used 6” thick slab steps, but combined them with 8” wall block for risers. This allowed us to build fewer steps, better follow the slopes, and fit the inset steps within a fairly tight space between the 2 walls. The effect of “floating” steps was really cool!
When we thought we were nearly at the end of the project, the client dropped another change order… could we continue the wall another 68’ along the street? Well, yes we can… but all these change orders accumulated to weeks’ worth of work. We completed everything we could, seeded areas that were finished, and left the job to complete 2 other small hardscape projects. We simply couldn’t delay those any further. Then we returned and built the final section of wall.
What were our challenges?
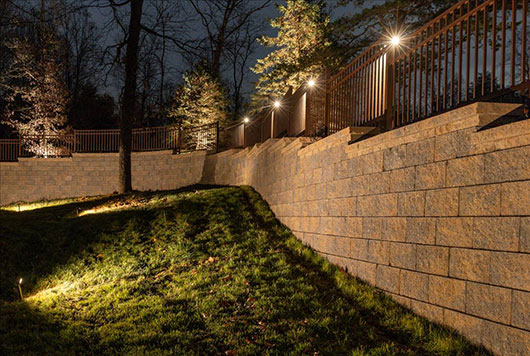
- All the changes and additions! We had planned for some basic lighting… but with all the other change orders with additional steps and wall, we added many more lights! We ended up with 12 floodlights on the new wall, undercap and post lights on the steps, 25 surface mount lights on the fence to light the lawn behind the wall, and up-lighting on the trees along the driveway. Numerous upgrades for electrical and drainage systems. Oh… and we graded and seeded almost an additional acre that was formerly just trees and brush.
- Tight access as described. Another factor that worsened it was some existing pipes that had to be extended and worked around. In hindsight, we should have taken the time to dig them much deeper behind the bench, and it would have eased the project.
- Wet soils. We could tarp our stockpiles of soil that we had excavated, but they were still wet. And we had zero control over the imported fill dirt. We had a very rainy March and April, and the wet soils were an endless struggle. We used about 6 bags of Portland cement and 30 ton of #3 stone to stabilize the first 150’ of the footer. Ultimately, we blended around 1.5 ton of hydrated lime and perhaps 100 ton of #57 stone with the imported fill just to be able to compact it. There is little else we could have done, other than pausing the project for a couple months to wait for drier weather.
- Numerous steps in both the footer and the top of the wall. There were around 17 steps up in the top of the wall, then about 10 steps back down in the extension along the street. This took a lot of planning, as Sleeve-Its were placed 24” down from the top of the wall to receive the fence posts… and had to hold up with the 8’ fence sections.
- Managing runoff during construction. The wall was 40’ to 50’ away from the driveway; while the driveway wasn’t extremely wide, that was a contributing surface area. And that area between the wall and the driveway was all disturbed surface area, and rainfall simply didn’t soak in. It all ran right into our work area, and there was no way to divert it. Post construction, we fought to control the water until the new lawn was established.
What was the purpose of this wall? It was to reduce the erosion next to the driveway, provide additional lawn space, and give space for the client’s elderly dogs to exercise. Did we meet those goals? YES! In the process, we built a monumental wall that had the whole neighborhood talking! Were we happy to do some paver projects after working on this wall for months? Yes… yes we were. Want to see the time-lapse of this project? Go to www.WillowGatesLandscaping.com/featured-project/retaining-wall-installation/
Jeremy Martin co-founded Willow Gates Landscaping in 2005. He became a CMHA instructor in 2016. He also founded Dust Killer Tools to help his company meet 2017 OSHA silica standards. Email Jeremy@DustKiller.tools. Visit WillowGatesLandscaping.com and DustKiller.tools